Ourdream is one such AI tool which slowly finds its way into a very personal space: your mind’s eye, friendship, creativity and feelings.
At its heart, it’s an AI-powered character and roleplay platform that lets people create, customise and interact with AI characters – romantic floridness or narratively-adventurous palavers (or an amalgamation of the two).
Is it just another AI chatbot? Not really. It’s more like a digital sandbox for anyone who loves to tell stories, make connections or just like to talk stuff out without fear of being judged.
Sometimes you want advice. Sometimes you want comfort. Sometimes you just want a little bit of conversation that doesn’t sound as dry as cardboard. That’s the lane Ourdream is competing for.
And honestly? It mostly succeeds.
How to use Ourdream: Step-by-step guide
Step 1 – Choose Gender & Visual Style
What you see
At the top, you choose a gender category, and in the center you choose the visual style.
1) Gender selector (top buttons)
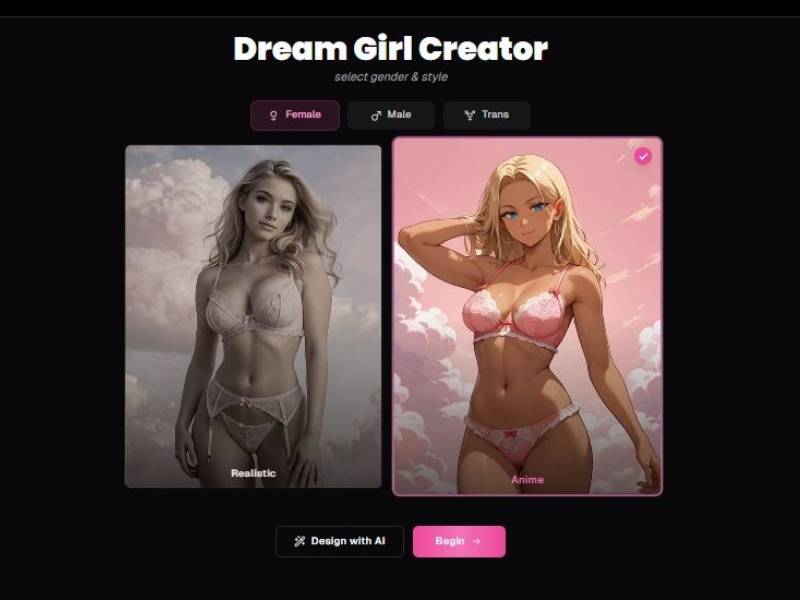
You have three pill-style buttons:
- Female
- Male
- Trans
Click one to set the base character type.
2) Visual style cards (center)
Two large preview panels:
- Realistic (photo-real look)
- Anime (illustrated/anime look)
The selected style is highlighted (in your screenshot, Anime is selected).
3) Bottom buttons
- Design with AI: Likely an assisted mode (the app helps auto-pick features or generate from a prompt).
- Begin: Starts the manual 7-step creation flow using your selected gender + style.
How to use Step 1
- Pick Female / Male / Trans.
- Choose Realistic or Anime.
- Click Begin to proceed.
Tip: If you’re unsure, pick Anime first-it usually tolerates more variation in hair/eye color without looking “uncanny.”
Step 2 – Ethnicity & Skin Tone
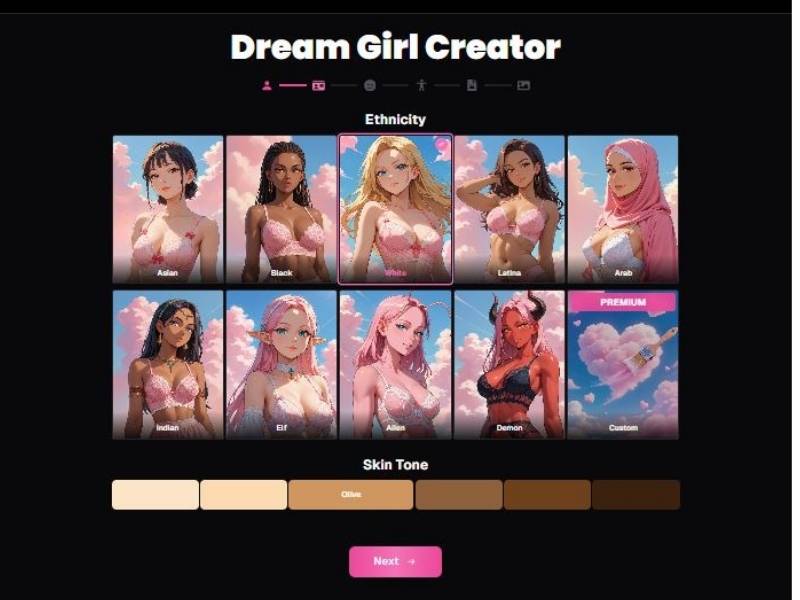
What you see
A grid of ethnicity presets and a skin tone palette.
1) Ethnicity grid
Visible options include:
- Asian
- Black
- White
- Latina
- Arab
- Indian
- Elf
- Alien
- Demon
- Custom (marked PREMIUM)
Click a tile to set the character’s ethnicity/fantasy type.
The fantasy options (Elf/Alien/Demon) are still treated like “ethnicity presets” in this UI-think of them as themed base models.
2) Skin Tone selector
A horizontal row of skin-tone swatches from lighter to darker shades.
- One swatch is labeled “Olive” (and appears selected in your screenshot).
Click a swatch to set skin tone.
3) Next button
- Next → moves forward.
How to use Step 2
- Select an Ethnicity tile.
- Pick a Skin Tone swatch (e.g., Olive or any other).
- Click Next.
Tip: If you choose a fantasy type (Alien/Demon), test a couple skin tones-those presets can look dramatically different depending on tone.
Step 3 – Face, Hair, and Color Styling
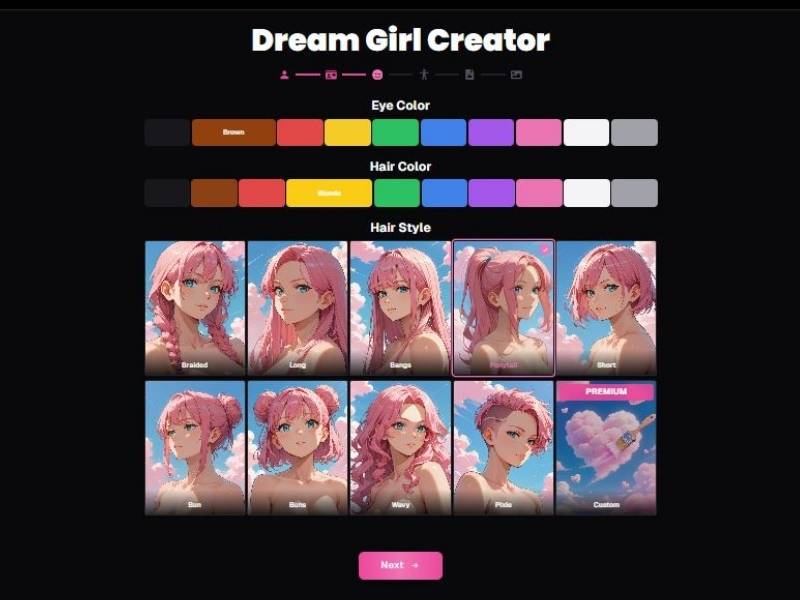
What you see
This step is about face/hair styling using color swatches and hairstyle tiles.
1) Eye Color palette
A row of color swatches (examples visible):
- Dark/black
- Brown (selected in the screenshot)
- Red
- Yellow
- Green
- Blue
- Purple
- Pink
- White
- Grey
Click a swatch to set eye color.
2) Hair Color palette
Another row of swatches (very similar set):
- Dark/black
- Brown
- Red
- Blonde (selected in the screenshot)
- Green
- Blue
- Purple
- Pink
- White
- Grey
Click a swatch to set hair color.
3) Hair Style tiles
You select from image tiles with labels:
- Braided
- Long
- Bangs
- Ponytail (selected in the screenshot)
- Short
- Bun
- Buns
- Wavy
- Pixie
- Custom (marked PREMIUM)
4) Next button
- Next →
How to use Step 3
- Choose an Eye Color swatch.
- Choose a Hair Color swatch.
- Pick a Hair Style tile.
- Click Next.
Tip: If you want a consistent look, pick hair style first, then adjust hair color-some styles read “better” with lighter/darker colors in anime mode.
Step 4 – Body Type Customization
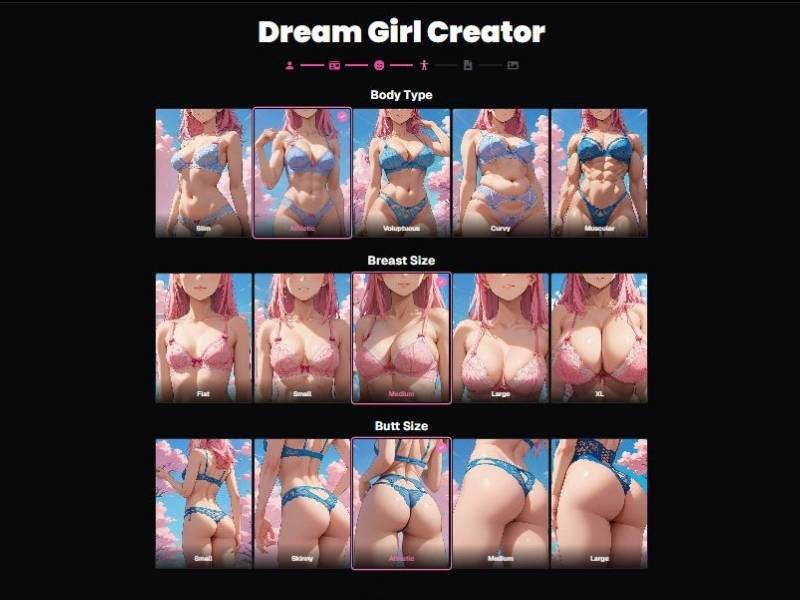
What you see
Three sections: overall body type, breast size, and butt size. Each is selected by clicking image tiles.
1) Body Type
Options shown:
- Slim
- Athletic (selected in the screenshot)
- Voluptuous
- Curvy
- Muscular
2) Breast Size
Options shown:
- Flat
- Small
- Medium (selected in the screenshot)
- Large
- XL
3) Butt Size
Options shown:
- Small
- Skinny
- Athletic (selected in the screenshot)
- Medium
- Large
How to use Step 4
- Select Body Type.
- Select Breast Size.
- Select Butt Size.
- Proceed (the Next button isn’t visible in your crop, but the flow continues to the next step via the standard navigation).
Tip: “Athletic” appears in both Body Type and Butt Size-mixing Athletic (body) with Medium/Large (butt) can create a more exaggerated silhouette if that’s what you’re aiming for.
Step 5 – Identity & Personality Setup
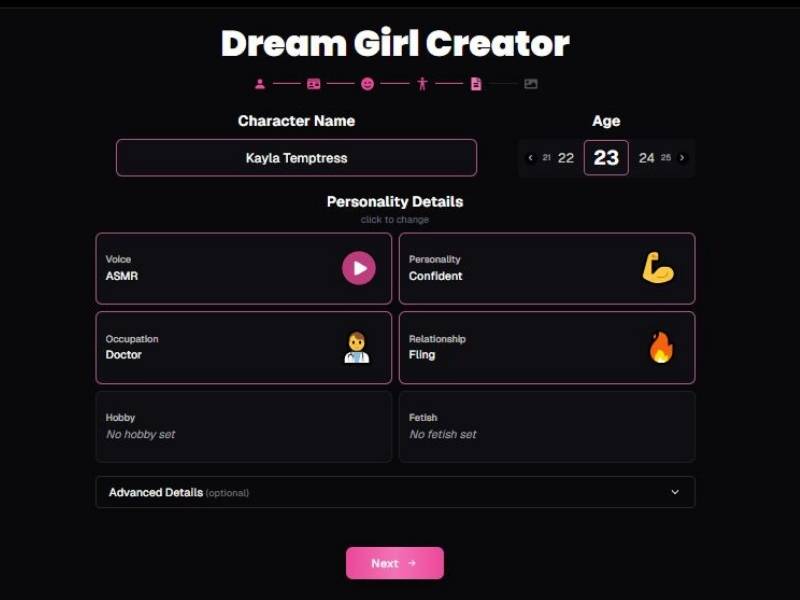
What you see
This step sets the character’s name, age, and personality “cards.”
1) Character Name
A text field labeled Character Name.
- Example shown: “Kayla Temptress”
You can click into the field and type a new name.
2) Age selector
On the right:
- A central highlighted age (example: 23)
- Small arrows/buttons around it to adjust (you can switch to 21, 22, 24, 25, etc.)
3) Personality Details (click-to-change cards)
A section labeled:
- Personality Details
- “click to change”
Visible cards include:
- Voice: example “ASMR” with a play button icon (suggests you can preview voice style)
- Personality: example “Confident” (flexed arm icon)
- Occupation: example “Doctor” (person icon)
- Relationship: example “Fling” (flame icon)
- Hobby: “No hobby set”
- Fetish: “No fetish set”
Each card looks clickable-selecting one likely opens a menu of choices.
4) Advanced Details (optional)
A collapsible dropdown labeled:
- Advanced Details (optional)
This is for extra fine-tuning (not expanded in your screenshot).
5) Next button
- Next →
How to use Step 5
- Enter a Character Name.
- Set Age using the selector.
- Click each Personality Detail card to customize:
- Voice (and preview with the play button)
- Personality trait
- Occupation
- Relationship type
- Hobby (optional)
- Fetish (optional, if supported by the platform/settings)
- Expand Advanced Details if you want deeper customization.
- Click Next.
Safety note (practical): Keep the character age clearly adult (18+) if the platform generates romantic/sexual content.
Step 6 – Final Review & Creation
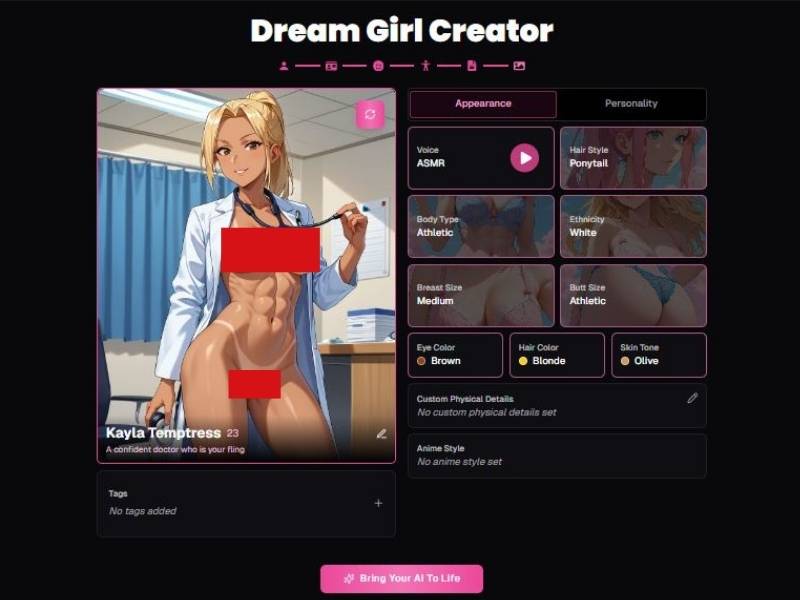
This screen is a “dashboard” where you preview the character and verify the settings before generating.
Left side: Character preview card
- A large character image preview.
- A small refresh / reroll style icon near the top of the preview (suggests regenerating the preview image with the same settings).
- Name and age displayed at the bottom (example: Kayla Temptress, 23).
- A short tagline/description line under the name (example: “A confident doctor who is your fling”).
- Tags area:
- “No tags added”
- A + button to add tags (useful for organizing or searching later).
Right side: Summary panels (two tabs)
At the top of the right section are two tabs:
- Appearance
- Personality
You’re on Appearance in the screenshot.
Appearance summary cards (clickable)
These show your current selections and usually act like shortcuts back to editing:
- Voice: ASMR
- Hair Style: Ponytail
- Body Type: Athletic
- Ethnicity: White
- Breast Size: Medium
- Butt Size: Athletic
- Eye Color: Brown
- Hair Color: Blonde
- Skin Tone: Olive
Custom sections (with edit icons)
- Custom Physical Details: “No custom physical details set” (pencil/edit icon)
- Anime Style: “No anime style set” (suggests extra style filters or presets)
How to use Step 6
- Review the preview image and your settings on the right.
- If something looks off, click the relevant card (Hair Style, Eye Color, Body Type, etc.) to revise.
- Optionally add Tags with the + button.
- Add optional refinements:
- Custom Physical Details (scars, tattoos, freckles, etc. depending on what the app supports)
- Anime Style presets (line thickness, shading style, etc. if available)
Pros and Cons
No tool is perfect, and pretending otherwise would be weird. Here’s a straight-up breakdown.
Pros
- Surprisingly natural conversations that don’t always scream “I’m an AI”
- Deep character customization (personality, tone, style)
- Strong emotional intelligence compared to many competitors
- Easy to use-no learning curve headaches
- Good balance between creativity and structure
Cons
- Can occasionally repeat itself if you push conversations too long
- Some features are locked behind paid plans
- Not ideal if you’re looking for strictly factual or productivity-focused AI
- Emotional attachment risk (yes, that’s a real thing)
Quick Snapshot Table
| Aspect | Rating | Thoughts |
| Ease of Use | ⭐⭐⭐⭐☆ | Clean interface, intuitive flow |
| Creativity | ⭐⭐⭐⭐⭐ | Big win here |
| Emotional Depth | ⭐⭐⭐⭐☆ | Better than expected |
| Value for Money | ⭐⭐⭐⭐☆ | Depends how often you use it |
| Originality | ⭐⭐⭐⭐☆ | Not groundbreaking, but well executed |
How Does It Work?
The setup is refreshingly simple. You arrive at the site, set up an account, and immediately start to craft a character – or select a previously created one.
Then the AI learns how you speak. Short replies? It mirrors that. Late night wall-of-text emotional messages? It leans in.
Behind the scenes, Ourdream has conversational AI models that are trained to retain consistency of personality, emotional tone, memory, and so on between different interactions.
The more you engage, the more its experience feels personalized – like a new pair of shoes getting broken in. It was uncomfortable at first, then oddly comfortable.
It’s not magic. It’s pattern recognition, reinforcement and smart prompting. But the illusion is effective more often than not.
Core Functionalities
Here’s where things get interesting.
| Functionality | What It Does | Why It Matters |
| AI Character Creation | Build personalities with traits, backstories | Makes conversations feel intentional |
| Roleplay Mode | Story-driven interactions | Ideal for writers, creatives, escapists |
| Memory Retention | Remembers preferences & context | Reduces repetitive chats |
| Tone Adaptation | Adjusts emotional responses | Conversations feel less robotic |
| Private Environment | Judgment-free interaction | Big plus for sensitive users |
This isn’t a productivity tool pretending to be emotional. It’s emotional first, everything else second.
Key Features
Some features quietly do heavy lifting without bragging about it:
- Custom Personality Sliders – You control warmth, sass, seriousness, and chaos. Yes, chaos.
- Narrative Continuity – Conversations don’t reset every five minutes like some platforms.
- Safe Space Design – No pressure to perform, impress, or explain yourself.
- Creative Freedom – Great for writers stuck in a creative rut.
- Responsive Dialogue – It reacts, not just responds.
And here’s something I didn’t expect: it listens. Not perfectly, but enough to notice.
My Verdict
Ourdream isn’t for everyone-and that’s okay. If you’re hunting for spreadsheets, code snippets, or business analytics, you’re in the wrong room.
But if you want connection, creativity, or conversation that doesn’t feel hollow, this tool earns its place.
I found myself oddly relaxed using it. Not blown away. Not skeptical either. Just… comfortable. Like talking to someone who doesn’t interrupt or rush you. That counts for a lot in a noisy digital world.
Would I recommend it? Yes-with boundaries. Use it as a companion, not a crutch. A creative outlet, not a replacement for human connection. When used that way, it’s genuinely enjoyable.
FAQs
Is Ourdream free?
There’s a free tier that lets you test the waters, but premium features live behind a paywall. Fairly standard stuff.
Can I create multiple characters?
Yes, and you probably will. It’s hard to stop at one once you get the hang of it.
Is it safe to use?
From a technical standpoint, yes. From an emotional standpoint-use common sense. Take breaks.
Is it good for writing or roleplay?
Absolutely. One of its strongest use cases, hands down.
Will it replace real relationships?
No. And it shouldn’t. It’s a supplement, not a substitute.
Final Thought
Tools like Ourdream exist because people crave understanding, imagination, and a place to unload thoughts without being judged. It doesn’t solve life’s problems, but sometimes it helps you breathe a little easier while figuring them out.
And honestly? That’s not nothing.