Promptchan is an AI image generator which leans hard into a niche that most platforms politely tip-toe around.
It’s designed for people who want to produce snazzy, frequently NSFW or fantasy-based visuals with text prompts, and don’t care about the technical underpinnings of AI models.
The vibe is simple: Click type what’s in your head, adjust a couple of settings and let the machine do some heavy lifting.
No lectures. No gatekeeping. Pure results – sometimes impressive, sometimes weird, sometimes accidentally hilarious.
I went in skeptical. This kind of thing often offers “creative freedom” and gives me the same recycled anime face a dozen times over.
Promptchan caught me off-guard… not always in a good way, but enough to make me click.
A comprehensive guide of how to use Promptchan
Step 1 – Enter Create mode

What you do:
- Click Create in the top navigation (the screenshot with the arrow pointing at “Create”).
What this changes:
- It opens the generator workflow where you write a prompt, choose style/model, poses, character, attributes, and emotion presets, then generate.
Tip:
- If you only see Explore results, you’re not in the actual generation workflow yet-switch back to Create.
Step 2 – Choose “Describe” mode and write your main prompt
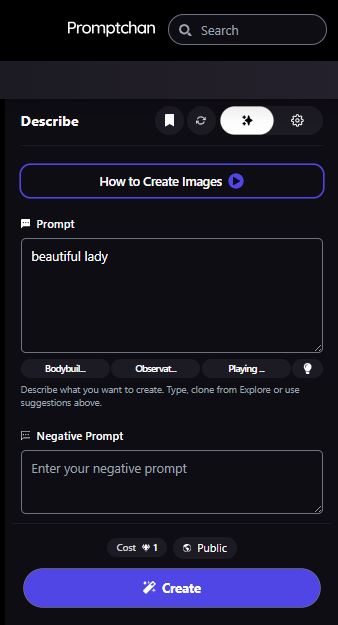
In the “Describe” screen (tall mobile-like screenshot), you have:
- A) Mode header: Describe
This indicates you’re in a text-driven creation flow where you type what you want.
- B) Top mini-icons (right side)
You have several small icons (bookmark/history-like, refresh-like, sparkles/advanced, gear):
- Bookmark/Save (likely): save a prompt or preset.
- Refresh: randomize/clear/reload suggestions (common in generators).
- Sparkles / Enhance: often used for “prompt improvement” or “magic” generation helpers.
- Gear: settings.
- C) “How to Create Images” help button
A visible help/tutorial button that opens instructions.
- D) Prompt text box
Example shown: “beautiful lady”
- This is the main instruction for your character/image.
How to write a strong “AI girlfriend” prompt
Include:
- Identity & vibe: “friendly”, “confident”, “soft smile”, “mysterious”, etc.
- Appearance: hair color/style, eye color, skin tone, makeup level, etc.
- Outfit: casual, dressy, streetwear, etc.
- Scene: café, bedroom lighting (non-graphic), city at night, studio backdrop.
- Camera cues: portrait, close-up, full body, depth of field.
Example prompt (safe, non-graphic):
- “Realistic portrait of a 22-year-old woman with long black hair, warm smile, natural makeup, wearing a cozy sweater, soft window light, shallow depth of field, high detail.”
- E) Prompt “chips” / suggestion tabs
Under the prompt box you can see truncated category chips like:
- Bodybuil…, Observat…, Playing…
These look like prompt suggestion categories. Clicking them typically inserts or suggests phrases in that style.
- F) Negative Prompt
A second box labeled Negative Prompt with placeholder “Enter your negative prompt”.
- Use this to exclude unwanted artifacts or styles.
Common negative prompt ideas:
- “blurry, low resolution, distorted face, extra fingers, bad hands, watermark, text, logo, overexposed, underexposed”
- G) Cost + Public + Create
At the bottom:
- Cost: how many credits you’ll spend.
- Public: whether results are shared publicly.
- Create: generate.
At this stage, you can already generate-but most users refine the output by selecting Style, Pose, Character, Attributes, and Emotion first.
Step 3 – Choose a Style (and possibly a Model)
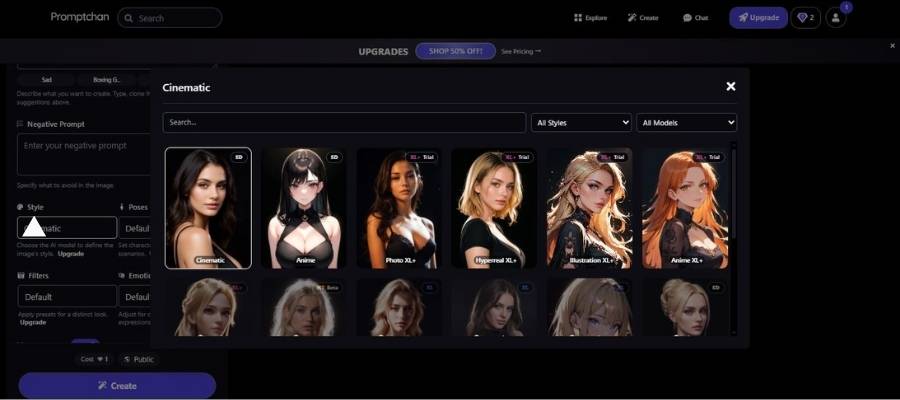
When you click Style in the left panel, a large modal opens (your “Cinematic” screenshot).
What you see in the style picker modal
- A Search field (to find a style quickly).
- Dropdowns such as:
- All Styles
- All Models
- A grid of style cards, including (as shown):
- Cinematic
- Anime
- Photo XL
- Hyperreal XL
- Illustration XL
- Anime XL
- Some tiles have Trial tags (available to test).
- Close button X in the top-right of the modal.
How to choose correctly
- Cinematic / Photo / Hyperreal: best for realistic “girlfriend” portraits.
- Anime / Illustration: best for stylized character art.
Practical workflow
- Start with Hyperreal XL or Photo XL for realism.
- If faces look “too perfect” or uncanny, switch to Cinematic or a more neutral “Default” style.
Step 4 – Choose a Pose (including “Custom Pose”)

In the “Poses” modal (your screenshot shows a dropdown like “Straight” and a grid including “Custom Pose” and other presets), you control the character’s body position and framing.
What you see in the Pose picker
- Search field for pose names.
- A dropdown (shown as Straight) – likely a pose category or filter.
- Another selector (shown as Select) – possibly pose subcategories.
- A Requests button (top right) – likely to request new poses.
- Grid tiles including:
- Custom Pose
- Default
- Other pose presets (some labeled as premium/plus/pro)
How to use this step safely and effectively
- Default is best for first results.
- Custom Pose usually allows you to define a pose more precisely (either via prompt guidance or a pose reference workflow, depending on the app).
Important note
This interface includes adult-themed pose presets. If you’re making content for general audiences, keep to neutral presets and disable “Public” before testing.
Step 5 – Choose the overall “Default” look presets (Filters / Style variants)
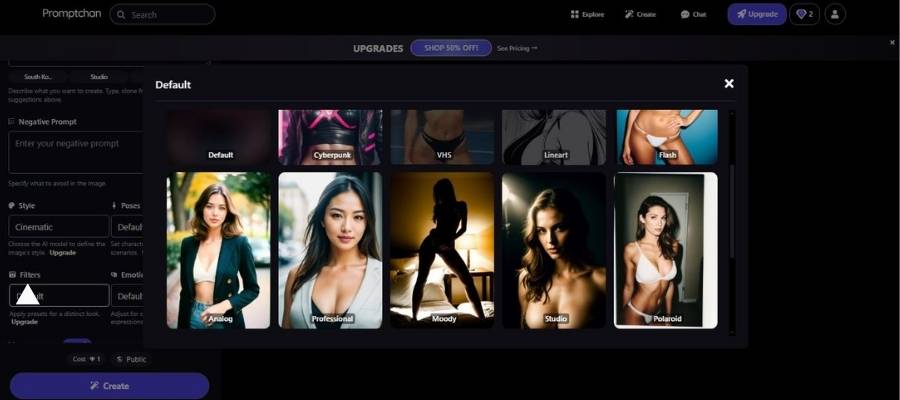
In the “Default” modal (your screenshot with tiles like “Analog”, “Professional”, “Moody”, “Studio”, “Polaroid”), you’re selecting a look/lighting preset.
Visible options in the grid
The UI shows tiles such as:
- Default
- Cyberpunk
- VHS
- Lineart
- Flash
And in the larger portrait tiles: - Analog
- Professional
- Moody
- Studio
- Polaroid
What these do (in practice)
- Professional / Studio: clean portrait lighting, crisp results.
- Moody: dramatic shadows, cinematic contrast.
- Analog / Polaroid / VHS: retro texture, film grain, vintage color shifts.
- Cyberpunk: neon lighting, futuristic palette.
- Lineart: sketch/illustration look.
- Flash: harsh direct light aesthetic.
Recommendation for an AI girlfriend starter
- Pick Professional or Studio first (most reliable).
- Then experiment with Moody for atmosphere.
Step 6 – Choose an Emotion / Expression preset

In the “Emotion” modal (your “Choosing Emotion” screenshot), you select a facial expression.
What you see
A grid of expression tiles, including:
- Default
- Smiling
- Angry
- Upset
- Disgusted
- Scared
- Ouch
- Shocked
…and at least one explicit adult expression preset, plus some tiles marked Plus, Pro, or Premium (locked behind upgrade tiers).
How to pick emotions for best “girlfriend” results
- Start with Smiling or Default.
- If you want a “story vibe,” choose Shocked, Upset, or Moody styling instead of extreme expressions (extreme expressions can distort faces).
Step 7 – Fine-tune character Attributes (Age, Weight, etc.)

In the “Attributes (New!)” panel (your tall screenshot), you can tune the character’s physical traits.
Attributes panel features shown
- Title: Attributes (New!)
- Toggle in the top-right: disable
- The UI text says: “Disable for non-character images.”
- Meaning: attributes are meant for people/characters; turn off if generating landscapes/objects.
Sliders visible
- Age (example shows “21 Years”)
- Weight (example shows “-50%”)
- Breast size (+15%)
- Ass size (+15%)
How to use attributes responsibly
- Keep Age clearly adult (18+). The UI lets you set age-use that intentionally.
- Use small adjustments first (±10–20%) to avoid unnatural anatomy.
- If results become distorted, reduce extreme slider values and rely more on prompt + style.
Bottom row again
- Cost and Public appear here too, plus Create.
Pros and Cons
Let’s not sugarcoat it. Promptchan has personality, but it also has baggage.
Quick snapshot
| Pros | Cons |
| Extremely easy to use | Very narrow content focus |
| Fast image generation | Output quality can be inconsistent |
| Built-in prompt ideas | Limited customization vs pro tools |
| No setup or tech skills needed | Not ideal for safe-for-work creators |
| Playful, low-friction experience | Can feel repetitive over time |
If you’re allergic to cluttered dashboards and endless sliders, this will feel refreshing. If you’re the type who wants pixel-level control, you’ll probably feel boxed in.
How does it work
Promptchan doesn’t overcomplicate things, which is both its charm and its limitation.
You start with a text prompt-anything from a short phrase to a detailed description. The platform nudges you with suggestions if you’re stuck (and yes, sometimes those suggestions feel like a mischievous friend whispering bad ideas in your ear).
Once you hit generate, the AI model processes your prompt and spits out images within seconds. No model training, no manual uploads, no fiddling with seeds unless you want to.
Behind the scenes, it’s standard text-to-image generation. On the surface, it feels closer to a creative toy than a professional studio tool-and honestly, that’s intentional.
Core Functionalities
Here’s what you’re actually getting when you sign up:
| Functionality | What it does | My take |
| Text-to-image generation | Converts prompts into images | Fast and fun, but not always precise |
| Prompt presets | Ready-made ideas to start from | Helpful, slightly repetitive |
| Style selection | Adjusts visual tone and aesthetics | Decent range, not endless |
| Image history | Saves past generations | Underrated and useful |
| Regeneration | Re-roll results with same prompt | Addictive in a “just one more” way |
It’s not trying to be everything. It’s trying to be easy, and most days it succeeds.
Key Features
Some features quietly do more work than they get credit for.
Notable highlights
| Feature | Why it matters |
| Beginner-friendly interface | No learning curve, zero intimidation |
| Speed-focused generation | Keeps creative momentum alive |
| Prompt guidance | Helps users who don’t “speak AI” yet |
| Consistent visual style | Useful for themed outputs |
| Browser-based access | Works anywhere, no installs |
What stood out to me is how little friction there is. You don’t feel like you’re “operating software.” You feel like you’re poking at an idea until it turns into something visual. That’s rare.
My verdict
Promptchan has the feel of that manic creative friend who won’t always be reliable, but will never be dull. (It’s not flawless, and it’s definitely not for everyone.
And if you’re a professional illustrator, you’ll likely outgrow it pretty quickly. If you’re experimenting, exploring fantasies or just curious about AI image generation without a technical migraine on your hands, it scratches an itch most tools don’t bother with.
At one point, I caught myself thinking, “This shouldn’t be this fun,” which, you know, is usually a good sign. It doesn’t pretend to be a serious piece of art software. It doubles down on what it is – and there’s an integrity to that.
Would I use it every day? No.
Would it be right for the right person? Absolutely.
FAQs
Is Promptchan beginner-friendly?
Yes. You can jump in with zero AI knowledge and still get usable results within minutes.
Does it require installing anything?
Nope. It runs entirely in the browser, which makes it easy to test without commitment.
Is the content strictly NSFW?
That’s the main focus, though how far you go depends on your prompts and settings.
Can it replace professional AI art tools?
Not really. It’s more of a creative shortcut than a full production suite.
Is it worth trying?
If curiosity has already dragged you this far, the answer is probably yes.